GertDuino Board Setup
Initial setup steps for a GertDuino board with an existing Raspberry Pi 2 system, and solve the Raspbery Pi reboot problem.
Introduction
The steps below assume you have:
- A Raspberry Pi 2, fully workable (power, network, display), running Raspbian (I had version 1.1)
- A GertDuino board (I had revision 5)
First get and read the GertDuino manual.
You would have learned that GertDuino board comes with two Atmel microcontrollers that can be programmed from Raspberry Pi: ATmega328p and ATmega48pa.
The following steps will get to the point where we load a program for each microcontroller from Raspberry Pi.
Mount GertDuino
Ensure the Raspberry Pi 2 is not powered.
Mount the GertDuino board on top of the Raspberry Pi 2.
Now Raspberry Pi does not want to boot any more and displays:
sh: can't access tty: job control turned offThe root cause for this seems to be a factory test program that the ATmega48pa comes with. The issue will be gone once we load a different program.
Some claim that adding the following line to /boot/config.txt and rebooting helps.
avoid_safe_mode=1This but did not help me.
Ensure the system is not powered.
Use the four jumpers the GertDuino board comes with. Put them in the position to program the ATmega48pa (marked in red in the image from the manual below).
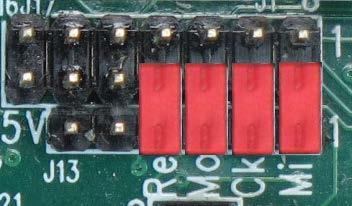
The step above should allow the Raspberry Pi to boot. Power the system. It should boot now.
Install software
Install the cross-compiler. This will allow you to compile code for the ATmega microcontrollers.
sudo apt-get update
sudo apt-get install arduino
Install avrdude. This will allow you to load code into the ATmega
microcontrollers.
cd /tmp
wget http://project-downloads.drogon.net/gertboard/avrdude_5.10-4_armhf.deb
sudo dpkg -i avrdude_5.10-4_armhf.deb
sudo chmod 4755 /usr/bin/avrdude
Setup the code examples.
cd ~
wget http://www.element14.com/community/servlet/JiveServlet/downloadBody/64547-102-2-287143/gertduino.zip
unzip gertduino.zip
Load program to ATmega48pa
Try to upload a program to ATmega48pa (we’ve already setup the jumpers in a previous step).
cd ~/gertduino/low_power
chmod u+x program_48
./program_48 low_power.hex
You might get an error like:
avrdude: AVR Part "m48pa" not found.To fix that error edit avrdude.conf.
sudo vi /etc/avrdude.confCopy-paste the section for ATmega48 and change the following fields for
the new ATmega48pa section: the id, desc and signature:
id               = "m48pa";
desc             = "ATMEGA48pa";
signature        = 0x1e 0x92 0x0a;
Try to upload a program to ATmega48pa, this time it should succeed.
cd ~/gertduino/low_power
./program_48 low_power.hex
Shutdown Raspbery Pi.
sudo haltLoad program to ATmega328p
Ensure the Raspberry Pi 2 is not powered.
Use the four jumpers the GertDuino board comes with. Put them in the position to program the ATmega328p (marked in red in the image from the manual below).
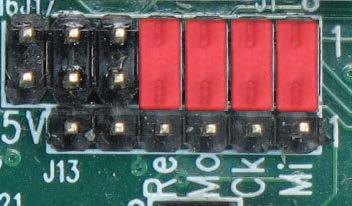
Power on the system. This time it should boot even if ATmega48pa is no longer reset.
Run one off clock setup (as per manual documentation)
avrdude -qq -c gpio -p atmega328p -U lock:w:0x3F:m -U efuse:w:0x07:m -U lfuse:w:0xE7:m -U hfuse:w:0xD9:mIf you get an error message like below, check the connection (between the Gertduino board and Raspberry Pi) and jumpers, then try again.
avrdude: AVR device not responding
avrdude: initialization failed, rc=-1
Load a program into ATmega328p.
cd ~/gertduino/blink
chmod u+x program_328
./program_328 blink.hex
This should work.
See it working
To see the LEDs blinking, you need to remove the reset for the ATmega328p. Either:
- remove the jumper from the reset position
- or use the
reset_offscript from the~/gertduinofolder
The reset_off and reset_on scripts also have issues, possibly because GPIO
8 on Raspberry Pi is now in default input mode. Commenting the last statement
(# echo 8 > /sys/class/gpio/unexport) gives mixed results. But that’s a
battle for another time.
And that’s the initial setup for the GertDuino board with a Raspberry Pi 2.